A couple of weeks ago, I went to the Dollar Tree to get a couple of crafting things. I saw a pumpkin silicone mold that I impulse bought assuming I could use it make some fun fall-inspired craft. It has since sat on my desk waiting for inspiration to hit. With fall coming to a close I knew I needed to make something with it. So, my 2 1/2 year old and I made marbled crayons in it by melting crayons in the oven.
Disclaimer: This page may contain affiliate links. As an Amazon Associate I earn from qualifying purchases. If you choose to make a purchase after clicking a link, I may receive a commission at no additional cost to you. Thank you for your support!
How to Make New Crayons by Melting Crayons in the Oven
Materials:
Prep:
First, grow a baby inside you for approximately 9 months. After giving birth, wait until your baby is old enough to color with crayons instead of just putting them in their mouth. Then, give your toddler a package of nice, new, perfect crayons. Wait until the crayons are worn down, broken, and your kid’s favorite color is missing. This will take anywhere from 5 minutes to 5 months depending on the child. Now set these crayons aside and repeat with a new box of crayons.
All joking aside, never throw away crayons. This craft is a perfect opportunity to use up old beat up crayons. Another great craft that reuses crayons is this suncatcher craft.
Actual Prep:
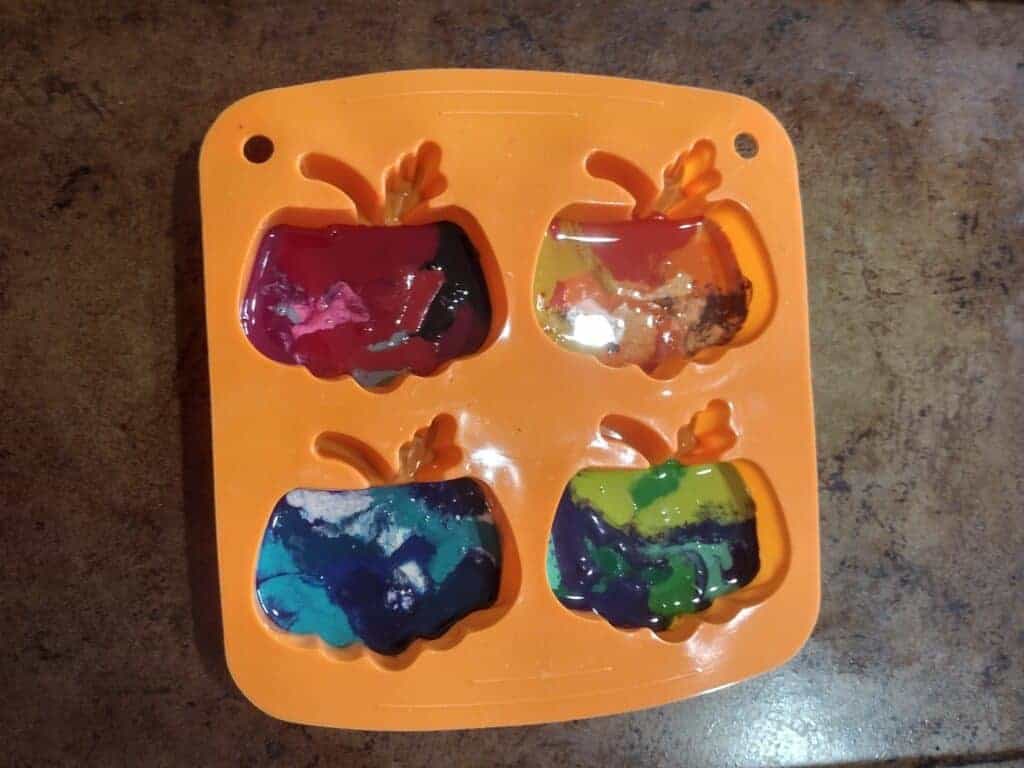
The only real prep you need to do to make your own crayons is pick out a silicone mold. I picked up my pumpkin mold at the Dollar Tree and it really didn’t work great. Each pumpkin is huge and the stem detail doesn’t start until halfway up it. I would recommend a smaller mold like these animal molds or you could even get a crayon shaped mold. I would also recommend only using your silicone mold on food or crafts, not both. Maybe it’s ok to go back and forth, but it sounds gross to me.
Lastly, preheat your oven to 200° F. You can also use a microwave or heat gun if you want to. If one of those options seems more your style, check out this article on melting crayons.
Creating:
To start, we worked on color sorting. My daughter knows her colors really well, but this was such a great opportunity to practice that we did it anyways. I had her sort all the broken crayons into piles by color. Once she had finished this we talked through color combos that gave us approximately the same amount of crayons for each of our four pumpkins.


Then, we went through each of the four piles individually. First, we took all the tape and wrappers off each crayon. I took the tape off and started the unwrapping to make it easier for my daughter. Once they were all unwrapped, we broke them. I broke the shorter ones and my daughter broke the longer ones. By the end she was snapping the short ones too and talking about how big and strong she was. We also talked about how she only gets to snap crayons when she is asked to. Lastly, my daughter put all the pieces into a pumpkin on our silicone mold.

Once we did the above steps with all four sets of crayon, we put the mold on a cookie sheet and put it in the oven.

It took about 18 minutes to fully melt all our crayons. I let my daughter look using the oven light several times during this process. Once all the crayons melted, I took the cookie sheet out of the oven and placed it on a cooling rack. I let my daughter look at them (with lots of warnings to not touch) while they were still melted.
Then we waited for our new crayons to cool. I think this took about an hour, but my daughter went down for a nap so I stopped checking on them. When she woke up, I let my toddler help me pop the crayons out of the mold.
Outcome of Melting Crayons in the Oven:
Besides my poor silicone mold choice, these crayons worked really good. They hardened up well and worked just as good as they did in their original form. They look nothing like pumpkins, but they do look fun and colorful. My daughter enjoys coloring with them and I enjoy the mix of colors each crayon gives. Another word of caution: don’t put white crayon in. It looks really cool on the outside, but according to my daughter “it doesn’t work” to color with. What do you think? What fun shapes do you want to try?