Disclaimer: This page may contain affiliate links. As an Amazon Associate I earn from qualifying purchases. If you choose to make a purchase after clicking a link, I may receive a commission at no additional cost to you. Thank you for your support!
Summer is quickly approaching. We took out our blow up kiddie pool for the first time this past weekend. My three year old daughter is so excited for all the outdoor play and fun things you can only do when it’s warm outside. My one year old is already an outside addict and will find his shoes and wait at the back door. I thought that it would be fun to add to the anticipation by doing a fun summer craft. My three year old and I learned how to make window clings using white glue. We of course had to make them summer themed.
Most crafts I just supervise my kids doing themselves. But, for these summer window clings, I couldn’t resist making a set myself. They are one of those crafts that you can make without needing to buy anything special and they turned out so good. My three year old and I had so much fun making them. And they make me smile every time I see them on the back door. Even my husband who isn’t super crafty thinks that they are pretty cool.
How to Make Window Clings Using White Glue
Materials:
- Cling wrap, wax paper, or any sort of clear plastic
- School glue
- Paint or permanent markers
Prep:
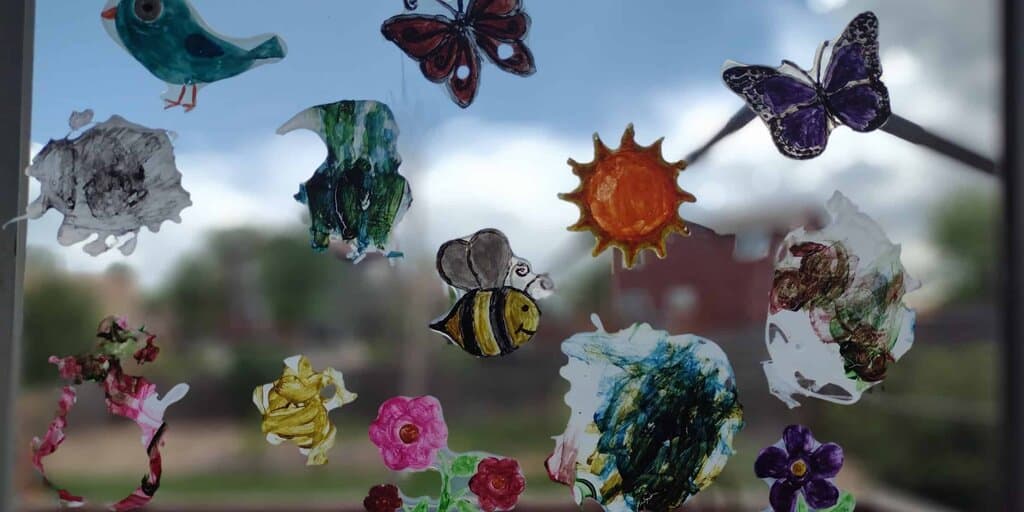
To start, you need to decide what shape window clings you want to make. I wanted summer themed window clings, so I found pictures of birds, bees, butterflies, and flowers on Clip Safari. Here are the summer pictures that I used. I made each picture fairly big and made sure there was a bit of space between each picture. Then, I printed my pictures out. I had two pages worth and made two copies so my daughter and I could make ours at the same time.
Next, I taped the pictures to our kitchen table. I taped both pieces of paper right next to each other. Then, I took some cling wrap and taped it over the papers. You can also use wax paper, clear plastic, or really anything that you can see through and glue won’t stick to. Make sure to do this someplace that you don’t need to use for a few days since you shouldn’t move this craft until the glue dries and is painted.


Shaping the Glue:
Now it’s time to get your kid involved. My three year old daughter loves using glue for crafts, so she very happily took a bottle of glue from me and started gluing on the pictures. I showed her how to trace the outside of a picture with the glue and then fill in the inside. But, she mostly wanted to do her own thing. She did a good job squeezing the glue on or at least near each picture. If your kid likes simple glue projects like this one, you should also check out our raised salt paintings.


Then, you need to wait for the glue to dry. Ours took about 1 1/2 days to fully dry. My daughter was so excited about this craft that every time she saw the table she asked if her window clings were dry and if she could touch them.


Coloring the Window Clings:
Since we used plain white glue for our summer shapes, we needed to color it. My daughter loves paint almost as much as she loves glue, so I decided to use that. Permanent markers would also work really well. I grabbed a bunch of small paper cups and put the colors of paint my daughter asked for in each one. She has painted a lot, so she has become really good at rinsing out her brush. She had all her window clings painted before I had even finished my bird.


The paint dried really quickly on the glue. With a little help getting them started, my daughter was able to peel her window clings off the cling wrap. While I painted more, my daughter pushed her kitchen tower over to the back door to put her window clings up high out of my son’s reach.


Over the next few days, I finished painting mine and added them to my daughter’s collection.

Outcome of How to Make Window Clings:
There is no way anyone could guess what my daughter’s window clings are supposed to be. You maybe could have guessed her bee until she decided to paint over the yellow and black stripes she initially painted on it. But, I think hers still look really cool and we both had a lot of fun making them. I have been really impressed by how well they stick as none have fallen off or have even drooped.
There are so many fun themes and shapes to try that we will definitely be making these again. It is going to be really fun watching the progression of my daughter’s window clings becoming more and more recognizable. And getting my one year old involved too. What theme of window clings would you like to make?