No kid’s birthday is complete without a cake (or another special dessert). My son just turned two and we themed his birthday around his love for balls. To go with our fun ball shaped food, decorations, and activities, I covered his cake in colorful (and yummy) balls. I have a tradition of making my kid’s birthday cakes in the shape of the age they are turning. So, I started with a number two shaped cake and added balls on top. This 2nd birthday cake is highly customizable. You can change the number, the shape entirely, the flavor, or even the decorations on top.
Disclaimer: This page may contain affiliate links. As an Amazon Associate I earn from qualifying purchases. If you choose to make a purchase after clicking a link, I may receive a commission at no additional cost to you. Thank you for your support!
How to Make a Ball Themed 2nd Birthday Cake
Supplies:
- Tools:
- Cake pan (I used this fun letter and number pan)
- Icing spatula
- Blender or food processor (optional)
- Cake Ingredients:
- Cake ingredients or box mix
- Frosting or frosting ingredients
- Ganache or ganache ingredients
- Colorful sprinkle confetti
- Ball Decoration Ingredients:
- Oreos
- Cream cheese
- White chocolate
- Food coloring
Making the Balls:
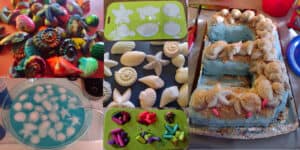
It seems weird to start a cake with the decorations, but that’s exactly what I did. A week and a half before my son’s party I made colorful Oreo cheesecake ball decorations. When I was in high school, I used to make these all of the time. But, to remind myself how to make them, I followed Lil Luna’s recipe. I used to always crush the Oreos using a rolling pin, but I used my mini blender instead this time. I also froze the insides before dipping them. Both of these tricks made them easier to make. I made the balls in a variety of sizes.

When it came time to dip them in the white chocolate, I used food coloring to make the melted white chocolate red, yellow, blue, and green. I dipped each batch before melting the white chocolate for the next color.
Once I finished making all of my balls, I put them in a bag and stored them in the freezer to add to the cake later. Sorry that I completely forgot to take a picture of them once I finished.
Making the Cake:
Two nights before the party, I made the base of my son’s cake. You can make it in any shape, but I will show you how I made mine in the shape of a number two. You can also make it with any flavor or cake. I used Life Love and Sugar’s recipe to make an Oreo cake.
First, I set up my letter and number pan to make a number two (backwards). Then, I mixed up my cake batter and poured it into the pan. The recipe I used baked their cake in three pans, so I baked my single pan for a few extra minutes.

After letting it cool, I unstuck the cake from the pan with an icing spatula. I forgot to grease my pan, so I was thankful that it still came out well. Then, I stuck it in the fridge to cool completely. Next, I cut off a few corners of the cake to make it into a better looking 2nd birthday cake.

Now it was time for the scary part of cutting it in half. I did this for the first time making my son’s castle cake. Once again it wasn’t as hard as it seemed and it turned out OK. Nothing a large amount of frosting couldn’t fix.

Frosting the Cake:
Now it was time to make the cake look good and add some delicious frosting. I continued using Life Love and Sugar’s recipe to make a yummy Oreo buttercream frosting. Again, any frosting will work. Once I made the frosting, I used an icing spatula to spread it all over the bottom half of my cake. Then, I placed the other half on top.

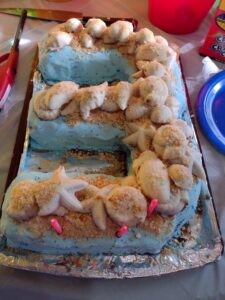
I used most of the remaining frosting to cover the top and sides of the cake. This is when my cake went from looking like the creation of a two year old to a two shaped cake.

After smoothing out the frosting, I stuck colorful polka dot sprinkles on the side of the cake. Lastly, I continued following the recipe and made chocolate ganache to pour over the top of the cake. I placed the cake in the fridge and once the ganache hardened, I covered it with plastic wrap.

Putting Together the 2nd Birthday Cake:
The day before my son’s birthday, I moved the Oreo cheesecake balls to the fridge. Then, the morning of the party, I put them on the top of my cake. This only took a couple minutes, which was perfect for the busy morning of my son’s 2nd birthday party.

Conclusion of My Son’s Oreo 2nd Birthday Cake
My son’s cake was simple, fun, and delicious. Along with all his other ball decorations, my son loved that this cake had balls too. The cake and it’s Oreo ball toppings were delicious. I froze what little remained of it and it thawed well in the microwave.
With the craziness of life, I needed something that was easy and stress free and this cake was just that. I loved that I could make lots of it ahead of time and that it was still specialized for my little boy.
What obsession does your two year have? If they love balls like mine, check out my other ball themed party ideas. And make sure to check out my cake designs from my kids’ past parties.