
Kids in the kitchen doesn’t always turn out great. It seems like every time you try to multitask you get less done. My kids somehow manage to create more work for me if I ever don’t pay 100% attention to them. That is what happened with my three year old daughter’s J is for jellyfish craft. I had such a lovely picture in my head on what it was going to look like. It was going to be the coolest alphabet craft so far. But, then I prepped some of the molds instead of watching my daughter while she stirred the first batch of Jell-O. And you can see how well it went from there.
But, while it isn’t the coolest Jell-O creation you have ever seen, it was still a lot of fun. I was able to last minute find a way starting with J to make it work and my daughter had a blast playing with the unset Jell-O. All that to say, enjoy your kid’s help in the kitchen even if it isn’t very helpful. And your J is for jellyfish craft will probably turn out way better than ours did. Making the J is great for talking about the alphabet, but you could also make just the Jell-O jellyfish for a fun under the sea party snack.
Disclaimer: This page may contain affiliate links. As an Amazon Associate I earn from qualifying purchases. If you choose to make a purchase after clicking a link, I may receive a commission at no additional cost to you. Thank you for your support!
How to Make a J is for Jellyfish Craft Using Craft Supplies Starting With J
Materials:
- Jell-O (or make your own)
- Smoothie straws
- Pool noodle (optional)
- Small plastic bowls
- 9″ x 9″ pan (or something similar)
- Parchment paper (optional)
- Plastic syringe
- Jute (optional)
Making the Jell-O Molds:
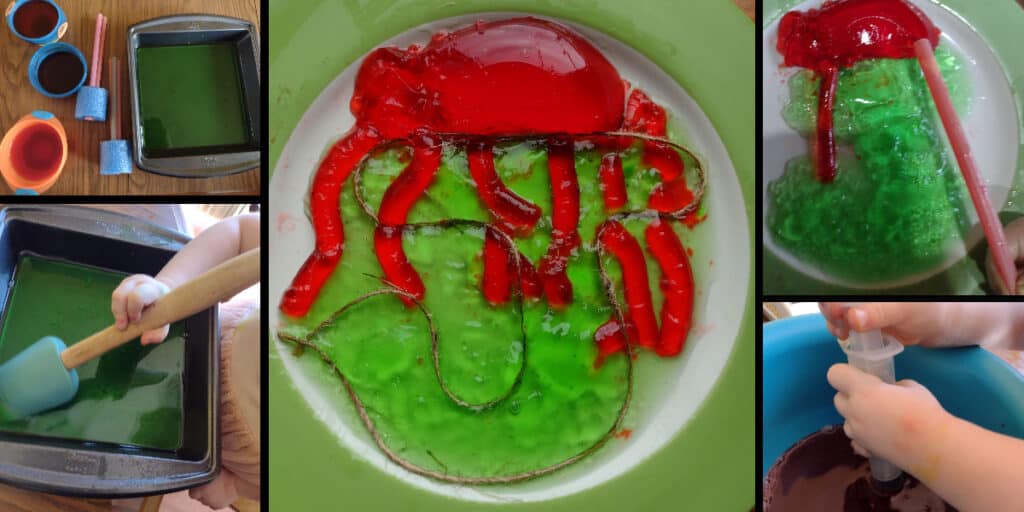
Before doing anything with the Jell-O, you need to make and gather your molds. First, you need to find some small bowls for the top of the jellyfish and a pan for the J. I used a 9″ x 9″ pan, but anything around that size will work.
Then, you need to make your jellyfish tentacle mold from straws. I used smoothie straws to get thicker tentacles. Fold over the bottom of the straw and tape it in place. Then, place a few of these straws in a container that will hold them steady and upright. We have made several crafts from pool noodles lately, so I used a chunk of pool noodle.


Once you have all of your molds made and rounded up, you need to make space for them in your fridge. Make sure they are going to fit and move things out of the way as needed.
Making and Pouring the Jell-O:
Now it is time to make the Jell-O. My daughter loves helping me make it and normally does a really good job. That is why I got her going on the Jell-O while I made the molds. In hindsight I should have done the molds beforehand so I could fully watch her. You need to make two different colors of Jell-O by following the instructions on the box. You can also follow One Lovey Life’s instructions on making homemade Jell-O.
The first batch of Jell-O will be for your J and you will pour it all into your pan. This is the one my daughter got bored with and didn’t keep stirring the whole time. This made it not set well at all.

The second color Jell-O will be for your jellyfish. You need to fill your straws and bowl (or bowls if you want backups) with it. Several years ago my husband and I made a cardboard hydraulic robot arm and we still have a bunch of Jello-O syringes left over from it. I showed my daughter how to fill one with the Jell-O mixture and squirt it into the straw. A smaller measuring syringe would be a lot cheaper or you could always try to just pour really carefully.


Once all your molds are full, you need to place them in the fridge to set (hopefully).
Constructing Your J is for Jellyfish Craft:
Once all your Jell-O pieces are set, it is time to assemble.

First, you want to cut your J out from your pan of Jell-O. I cut out a large letter J from parchment paper to use as a pattern. If your Jell-O is set you should be able to lay it on top and cut around it. Mine just stuck and sank part way into the unset Jell-O. I considered putting my jellyfish parts back in the fridge and making another batch of Jell-O to try again. But, my daughter had been looking forward to eating her Jell-O all day and I didn’t want to disappoint her. Once you cut out your J, you will want to carefully move it to a plate.

Then, gently loosen the Jell-O from the sides of one of your bowls with a knife. Flip it upside down to get it to come out. Then your child can cut off a section from the bottom to give it a more jellyfish bell look. My daughter used one of her child safe kitchen knives. Carefully move it to sit right above your Jell-O J.


Now it is time for the most fun part. Show your child how to squeeze the Jell-O out of the straw. Guide them to squeeze it starting at the bottom of the jellyfish’s bell and going a little ways down. This will create super fun looking tentacles for your J is for jellyfish craft.


Saving Our J is for Jellyfish Craft:
At this point the J I had tried to form with unset Jell-O had lost all shape. I wanted a recognizable J even if it wasn’t the best. I looked at my list of alphabet craft ideas and saw jute as one I had written down for J. Since I happened to have some, I quickly cut a piece of jute and stuck it in the green Jell-O in the best J shape I could make. If your Jell-O J worked there is no reason for this step unless you just want to add another J to your J is for jellyfish craft.

Conclusion of J is for Jellyfish Craft:
Yikes, our J is for jellyfish craft looks like a disaster. But, my daughter loved making the Jell-O, squirting it into the straws, and squirting it back out of the straws. While I tried to fix the J with the jute, my daughter had a blast squirting the remaining Jell-O out of the straws onto a plate. And both kids loved eating Jell-O afterwards. So, while ours looks pretty terrible, I would still highly recommend trying it. It will be fun and will probably turn out a lot better. And if not it is at least good for a laugh and a lesson on the letter J.
Make sure to check out our other alphabet crafts. And let me prove to you that all our crafts aren’t this ridiculous by subscribing to my weekly newsletter at the bottom of this page.


The ones that are not perfect are the most memorable. I remember my mother singing, “Hey Mr Bunny, your ears are too long…….” when your mom was little and we tried to make Easter Bunnies. You and you mom got your talent from Grandpa’s side of the family.
My home Economics teacher taught us how to fix things when we mess them up. I cut a hole in the shoulder of the first shirt I made. She added tabs to put a scarf through to cover up the patch, You added Jute and it works fine.
I love that she was able to teach that. Even the biggest mistakes can be worth a laugh and can probably be fixed too.