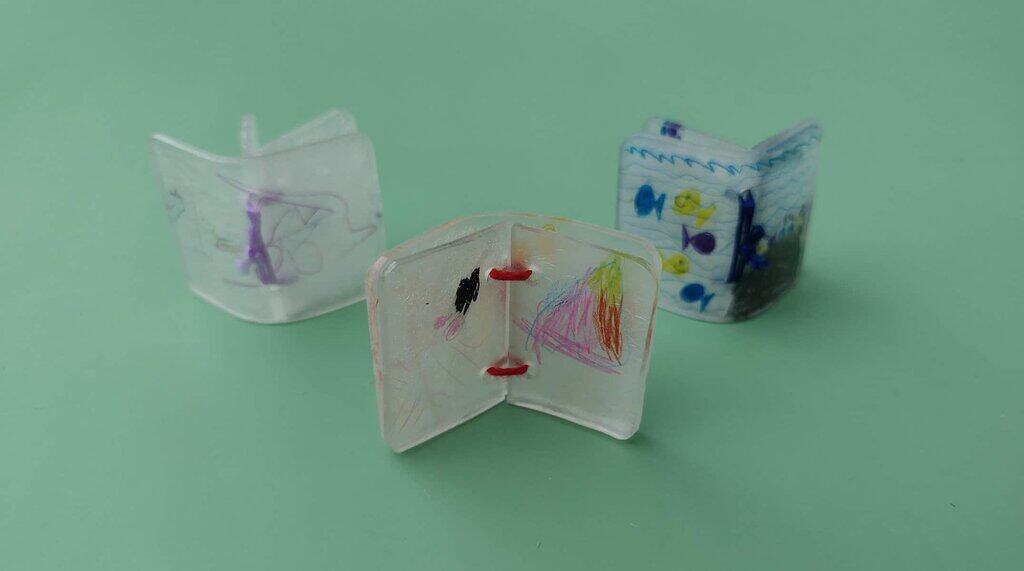
My three year old daughter loves “reading” books to her elephant lovey named Lumpy. The stories are hilarious to listen to. They have phrases from all sorts of books and songs mashed together in them. Recently, I have been feeling nostalgic about Shrinky Dinks. So, I thought it would be fun to make shrink plastic books with her and my 1 year old son. And this Shrinky Dink craft was so much fun, I had to make one too.
I bet you can guess whose book is whose in the title picture. My one year old son scribbled a bit on his pages. My three year old daughter drew me, Lumpy, a chair, and her brother on her pages. At my daughter’s request, I drew pictures of one of my daughter’s favorite songs, “The Goldfish (Let’s Go Swimming)”. I love that there are so many different ways to approach this craft and that it can work for any age.
Just to avoid confusion: Shrinky Dinks are the original name brand of shrink plastic. I will be using both the terms Shrinky Dink and shrink plastic interchangeably.
Disclaimer: This page may contain affiliate links. As an Amazon Associate I earn from qualifying purchases. If you choose to make a purchase after clicking a link, I may receive a commission at no additional cost to you. Thank you for your support!
How to Make a Book Shrinky Dink Craft:
Supplies:
- Shrink plastic (you can also use #6 plastic)
- Hole punch
- Colored pencils or Permanent markers
- Parchment paper
- Embroidery floss
Prep:
To start, you need to get your shrink plastic ready. An older kid could do this themselves, but I did the prep for my kids. If you want to make yours the exact same size as mine, you can use this pattern. Keep in mind that different brand plastics shrink different amounts. So, you may have to experiment a bit.
First, I cut the Shrinky Dink plastic into two rectangles. One rectangle I left alone to use as the book cover. Then, I cut the other rectangle in half to make two book pages.

Next, I used a hole puncher to punch two holes in the middle of the cover and two holes off to the side of the pages.

Lastly, I rounded the corners to avoid any sharp edges.

Creating:
Making the Cover and Pages:
Now it is time to draw! If you are using colored pencils, you need to make sure to draw on the rougher side. Permanent markers work on either side. If you are using colored pencils, they can be kind of hard to see. The colors will darken in the oven, but I put pieces of white paper under my kid’s shrink plastic to help them see. Also, I placed a piece of paper over half of my daughter’s cover so she knew to draw two different pictures on that piece.


Once all of us finished drawing, we put our Shrinky Dinks on a cookie sheet. To keep them from sticking, we placed them smooth side down on parchment paper.

Then, I preheated my oven to 330 degrees Fahrenheit. Once it was hot, I put our artwork in the oven. Then, we watched it move and shrink. It only took a couple minutes for it to flatten back out. Once it was flat, I left it in for approximately another minute.
After I took them out of the oven, I immediately held one side of each cover with my oven mitt. Then, I folded the other side using a butter knife. I held it at that angle until it hardened. Since I had three covers, I wasn’t able to get them all folded while they were still flexible. If this happens, all you have to do it put the pieces that still need folded back in the oven. After a minute or two, they will be soft enough to try folding again. I like the folded book cover look, but if you don’t want to mess with this step, you can just leave your covers flat.

Binding the Book:
Now it’s time to bind the book. To make threading my embroidery floss through the small holes easier, I used a large needle. If you don’t have a big enough needle, you can wrap a small piece of tape around the end instead.
First, I threaded my embroidery floss through the top hole of my cover. Then, I threaded it through the top hole on both pages and back through the same hole on the cover.

Next, I threaded my floss through the other cover hole. Then, through the other two page holes. And lastly, back through the second cover hole. The below picture has all the threading super loose to help show the threading pattern. After taking that picture, I pulled all my embroidery floss tight. Lastly, I tied the two ends of my floss together and cut off the extra.


Now, we all had our own unique mini book.


Conclusion of Book Shrinky Dink Craft:
My daughter loves reading her Shrinky Dink book to her lovey. She also will run around with my book when I play her goldfish song. I think all three books turned out super cute and fun. I love that the ideas with these are really limitless. They could have fun pictures, made up stories, or shortened versions of a favorite book. I am so excited to see what great ideas you all come up with. What story did your child make?