Disclaimer: This page may contain affiliate links. As an Amazon Associate I earn from qualifying purchases. If you choose to make a purchase after clicking a link, I may receive a commission at no additional cost to you. Thank you for your support!
Popsicle sticks, magnets, and puzzles are all preschooler favorites. These magnetic popsicle stick puzzles use all of these to keep your kid entertained. We made them specifically for an upcoming road trip, but your child can use them as entertainment any time. You can make them in a variety of ways and sizes. I made mine two different ways and used three different size popsicle sticks. My three year old daughter helped me make them.
We are planning to let my daughter use them on a cookie sheet that we can easily pass back to her while we are in the car. If you haven’t used a cookie sheet for road trips before, it is a great tool. You can do so many magnetic activities with them and they work well as a simple flat surface for your child to use. And if you are feeling really adventurous, you can even bake cookies in your parked car.
How to Make Popsicle Stick Puzzles
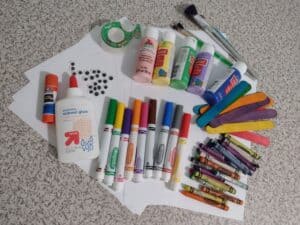
Materials:
- Popsicle sticks (jumbo, regular or mini)
- For Drawing Puzzles:
- Tape (I used masking tape, but any kind will work)
- Markers
- For Printed Puzzles:
- Magnetic tape
- Snack size zipper bags (optional)
- Tape (optional)
- Cookie sheet (optional)
Two Ways to Make the Puzzle Pictures:
Way 1- Drawing
The first way to make these puzzles is to draw your picture. Before doing any drawing, you need to set up your popsicle sticks. I used both mini popsicle sticks and regular popsicle sticks, but any size works. I lined up my sticks and straightened them out by pushing on them gently with the straight edge of the marker box.


Once they are nice and straight, gently put a piece of masking tape across the popsicle sticks. For the mini ones I used one piece and for the normal sized ones I used two.


Now, flip your blank puzzles over and start drawing. We used markers. Markers are my daughter’s special colors she only gets while doing crafts. So, she is always extra excited when she gets to use them.


To continue my trend of lovey themed crafts, I drew a picture of my daughter’s lovey named Lumpy on a set of mini popsicle sticks. My daughter colored her version of Lumpy on normal sized sticks and a picture of herself on mini sticks. At this point, she can draw bodies and faces with things mostly in the right spot, but her Lumpy was just a bunch of scribbles.


Lastly, take the tape off the back. My daughter had to try our puzzles out right away. She really liked herself and my Lumpy, but her scribble Lumpy was too hard. I explained that recognizable bodies and faces make putting puzzles together easier. To my surprise, she understood and quickly agreed to draw something on the other side. She drew a picture of her brother instead. We tested it out again and she liked it a lot better.


Way 2- Printing and Gluing
The second way we made puzzles was by printing out pictures and gluing them on. While my daughter finished with her markers, I pulled up Clip Safari and let her choose two pictures. To make easier puzzles, I guided her towards more colorful pictures. She choose a butterfly and a peacock that I printed out on regular printer paper.
For these puzzles, I used jumbo popsicle sticks. I only had colored ones on hand, so it made sense to glue something on them instead of draw on them. First, I laid down my printed out picture. Then, I had my preschooler use a glue stick to get glue all over the back. At first, we tried to use white glue, but it colored and cracked the paper.
Then, I laid the popsicle sticks down on top of the paper and straightened them with a straight edge.

After waiting for the glue to dry, I cut the popsicle sticks apart using an X-ACTO knife. I reapplied glue to any pieces that weren’t fully stuck on. This method is pretty straightforward, but I am still sorry I didn’t take more pictures. Don’t hesitate to ask questions in the comments if any of it doesn’t make sense.
Adding the Magnets:
To add magnets to my puzzles, I used long strips of magnetic tape. My tape was wider than even the jumbo popsicles sticks. So, I cut my magnetic strips in thirds width-wise for the regular and mini sticks and halves for the jumbo sticks. Then, I stuck them on the back. While these magnets were a little too weak for my magnetic roadmaps, they were more than strong enough for these puzzles.


Storing the Popsicle Stick Puzzles:
It took quite a few popsicle sticks to make 5 puzzles. I didn’t want all the pieces mixed together and have to remember what each puzzle is supposed to look like. Especially in the car with lots of other pieces of entertainment floating around.

So, I stored each puzzle in a little snack size zipper bag left over from my daughter’s birthday party favors. Then, to make it easy to know which puzzle is inside, I taped a picture of the puzzle picture on the front. I covered the entire picture with tape to make it a little more durable. For the three puzzles we drew, I took a picture of each and printed them out. For the two I printed out, I just printed out another smaller version of the picture.

Then, I went one step further and added magnetic tape to the back of each bag. I thought it would be even easier if my daughter could stick both her bag for the pieces and the puzzle pieces to her cookie sheet. Hopefully, this will help cut down on lost pieces in the car.


Outcome of My Magnetic Popsicle Stick Puzzles:
Since we haven’t left on our road trip yet, my daughter hasn’t got her puzzles yet. But, she really liked playing with them before they were magnetic. So, I think they are going to be a hit. I will have to update this post on how well they both entertain and stay off the floor. What entertains your kids for the longest in the car?
Update: they weren’t played with very much on our road trip. We brought so many fun things with us, she only had the chance to play with these puzzles once. The time she did play with them, she got very excited about the peacock and did a really good job putting the pieces together.