My now 5 year old daughter loves all things Disney princess and pink. So, that is exactly what we did for her 5th birthday party. To make it simpler, we narrowed it down to just Elsa, Rapunzel, Cinderella, and Sleeping Beauty. I kept her Disney princess cake simple, but made sure to incorporate all 4 of these princess. We also have a tradition of making birthday cakes in the shape of the number they are turning, so we made this cake into a 5. This same design would work with another shape as well.
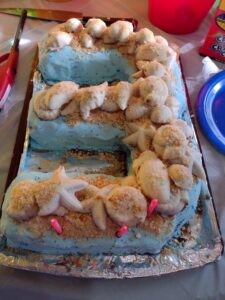
For inspiration on making this cake, we went to an unlikely place. And that was my son’s castle cake from his knight and dragon party and his garbage truck cake. My daughter loved the ice cream cake from my son’s garbage truck cake. So, we took that and just tweaked it a bit. And we also took his castle cake design and made it more girly.
If you want to make a regular cake, just skip the “Making the Cake” section and make the type of cake you want instead.
Disclaimer: This page may contain affiliate links. As an Amazon Associate I earn from qualifying purchases. If you choose to make a purchase after clicking a link, I may receive a commission at no additional cost to you. Thank you for your support!
How to Make a Disney Princess Birthday Cake
Materials:
- Candy Melts
- Chocolate bar mold
- Cake ingredients
- Cake pan (I used this really cool number and letter pan)
- Parchment paper
- Frosting
- Food coloring
- 4 Sugar cones
- Icing spatula
- Disney princess figurines (I used a Rapunzel, Sleeping Beauty, Elsa, and Cinderella Tonie)
Making Disney Princess Cake Decorations:
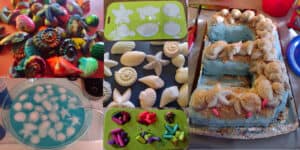
One of the things I loved about this Disney princess cake, was how much of it I could make ahead of time. This included the chocolate bricks. You can make them a couple weeks ahead of time if you want to. And then you have one less thing to do right beforehand.
The colorful bricks are easy to make. First, follow the directions on the Candy Melt package to melt them in the microwave. Then, spread them into a chocolate bar mold and let them cool a bit on the counter. Once they have cooled a bit, stick them in the fridge to harden the rest of the way. You don’t need them cold, just solid enough to cleanly pop out of the mold. Then, stick them in a bag and store them in a cool dry place until you are ready to decorate your cake with them. I made pink, blue, and purple to match the colors of my daughter’s party.

Making the Cake:
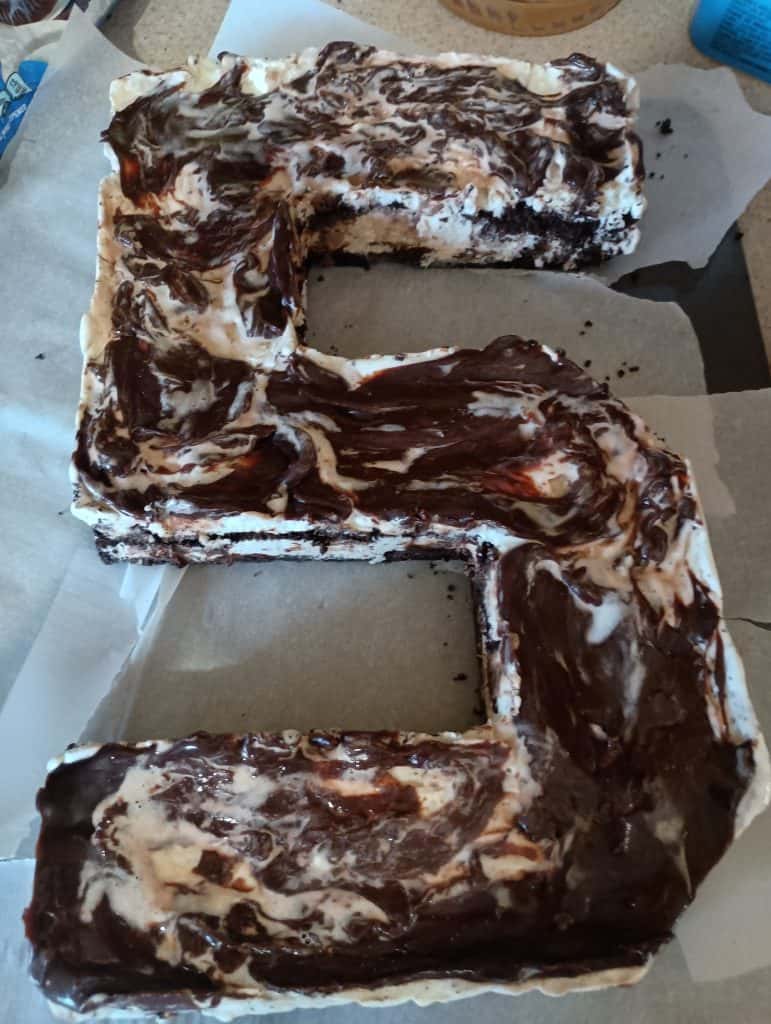
Start by making your cake. I made a fudge ice cream cake for my daughter’s Disney princess cake. If you are making a different flavor of cake, skip to the “Decorating the Cake” section.
First, get your pan ready. Set up your pan (I used this number and letter pan to make the number 5) by lining it with parchment paper. Butter the bottom and sides of the pan to help the parchment paper stick.
Now, it is time to start layering your delicious ice cream cake.
Layer 1 – Oreo Crust
My daughter didn’t want a pretzel crust like her brother, so we made an Oreo crust instead. Sally’s Baking Addiction has a great Oreo crust recipe. After you make whatever crust your kid wants, put it in the freezer for 15 minutes to harden.

Layer 2 – Fudge
Next, spread on a layer of fudge. I really like Sally’s Baking Addiction’s hot fudge recipe. To make enough for this cake, I doubled it. Use 1 cup of it for this layer and put the rest in the fridge once it cools. Spread the hot fudge as evenly over your crust as you can. My daughter wanted to help and spreading all the layers was a perfect job for her.


Then, put the cake back in the freezer for another 15 minutes. Once the rest of the fudge cools completely, put it in the fridge to use in later layers.
Layer 3 – Ice Cream
Then, spread on your first layer of ice cream. My daughter wanted to be different with her flavors of ice cream. She chose vanilla and cookie dough. And I should have written this post sooner because I don’t actually remember which one we put on first. But it doesn’t really matter, just put a yummy flavor of ice cream on next. To make it spreadable, leave it out on the counter for about 15 minutes. We spread on about 3/4s of a 1.5 quart tub of ice cream. Now put it in the freezer for at least 30 minutes.
Layer 4 – Oreo Fudge
Now, follow Sally’s Baking Addiction’s ice cream cake recipe for the middle Oreo layer. It uses the hot fudge you already made along with more Oreos. Because my hot fudge was more of a cold fudge at this point, it was challenging to spread. Then, put it back in the freezer for 30 minutes.

Layer 5 – Ice Cream
It is time for more ice cream! Once again soften your ice cream on the counter for about 15 minutes before spreading it on top. Then, freeze it for about 20 minutes.
Layer 6 – Fudge
For your last layer, spread on the last cup of the fudge you made for layer 2. You are now done making your ice cream cake. Put it in the freezer for at least a day to fully harden before you frost it. Or at least that is what I saw on one of the ice cream cake recipes I looked at. I didn’t want to risk a shorter time and making this much of my cake ahead of time was nice.

Finishing Up:
To finish up the cake, carefully pull the cake out of the pan and peel off the parchment paper. Cut any pieces off that will help it look more like the number you are going for. Then, tear the parchment paper into strips and carefully tuck it under the edge of your cake. This will help you keep things clean when you frost your cake.
Decorating the Disney Princess Cake:
Frosting Your Cake
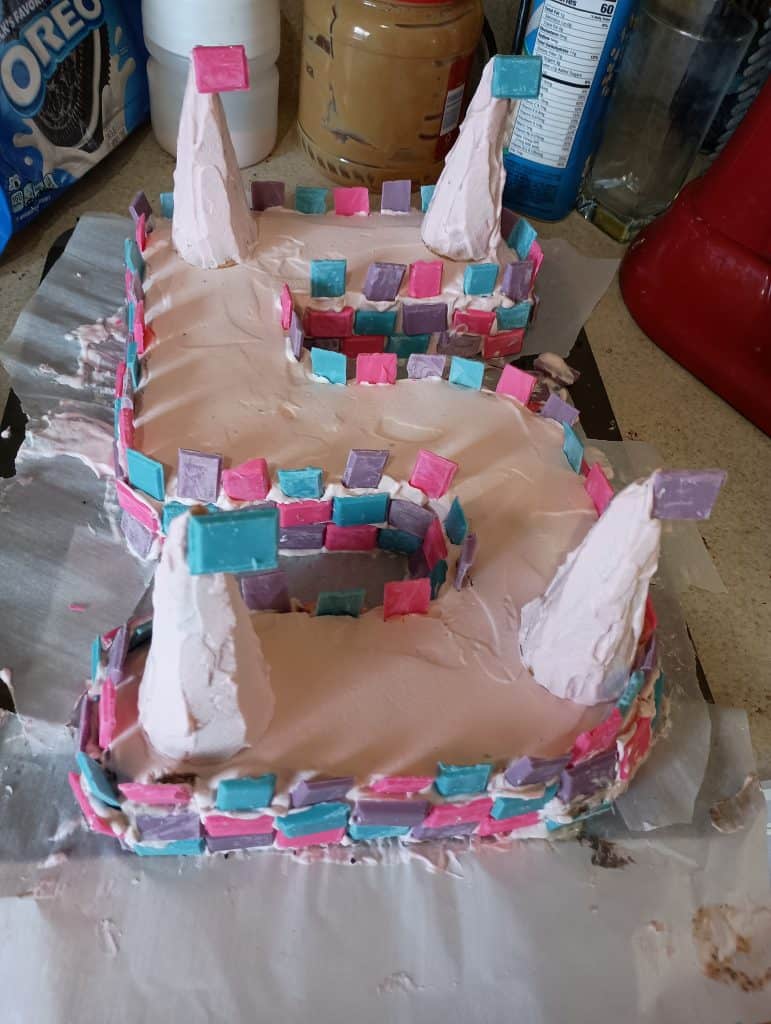
Decorating your Disney princess cake is really simple. Start by frosting it. I used Sally’s Baking Addiction’s whipped cream icing recipe and mixed pink food coloring into it. Then, spread this all over the top and sides of the cake along with 4 sugar cones using an icing spatula.


Adding the Bricks and Turrets
Lastly, put the finishing touches on your cake. Start by sticking all the chocolate bricks you made on the side. If you are made an ice cream cake, don’t make the same mistake as me and place it back in the freezer every little bit. Mine started melting which made it all look a little sloppier than I wanted. Then, place your pink waffle cones on the corners of your cake and make flags by sticking one chocolate brick on each.
Serving Your Disney Princess Cake:
If you make an ice cream cake, remember to take it out about 15-20 minutes before serving it. Then, use a skewer, chopstick, or something similar to poke holes in the top of it to put your candles in. Next, place your princess Tonies (I used Elsa, Cinderella, Aurora, and Rapunzel) or figurines on top. To make sure I didn’t contaminate the cake, I washed all the Tonies and taped parchment paper to the bottom of each one. Lastly, enjoy!


Conclusion of Our Disney Princess Birthday Cake
Yum. This was both a great tasting Disney princess cake and my daughter absolutely loved the look of it. All her friends really liked the chocolate bricks and kept asking for more. It was a very simple design and I loved being able to make so much of it in advance. How did your kid’s cake turn out? What flavors and colors did you use?
Make sure to check out everything else we made for my daughter’s party and some of of our other fun cake designs.